Friday 30 May 2014

What is a dam? 

A dam is a wall of solid material built across a river valley or catchment to block the flow of the river. 
The dam wall creates a lake and allows water to continue flowing down steam of the dam. Dams 
create a permanent supply of water for the community to use. The dam must be watertight so it is 
safe and stops water from escaping downstream and the walls must be strong enough to resist water 
pressure. The higher the dam, the greater the depth of water stored behind it, and the greater the 
water pressure on the dam wall. 

A dam must have a way of releasing water in controlled amounts so people can use it. Water is 
released into a network of pipelines that supply homes, businesses and farms with water. 

If it rains heavily, or if the river floods, water can escape over a concrete ‘spillway’ and into the river 
downstream. A spillway is usually built at the side of the dam wall. Dams also can have large steel 
release gates or come valves to allow water to flow out when required. If the dam is built of concrete, 
water can even flow over the dam wall. 

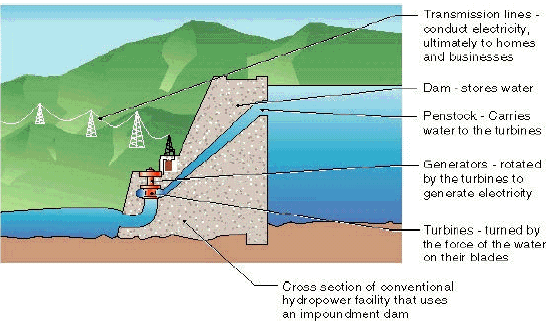
Some dams are constructed to provide flood mitigation while others are for drinking water storage 
and others to produce Hydro electricity. 


 How are dams built?                                          Each dam is different – some are small and deep, some are shallow and wide. It all depends on       the size of the river and shape of the valley. Dams can be made from different materials. There       are two main types of dams. 
      Concrete dams are made of strong, solid concrete walls that resist the pressure of water; 
      Earth and rock fill dams have a solid core of clay in the middle to prevent water leakage, and 
      an outer layer of rock for strength. 

Dams and the environment 
 A dam built across a river will impact the river valley. Plants, animals, roads, farms and sometimes 
even towns will be flooded. The flow of a river downstream will also be disrupted, and fish and wildlife 
may be threatened. This is why all modern dams undergo strict environmental controls to minimise 
their environmental impact. 

Some ways to reduce the environmental impact of dams are: 

 Working with the local community to relocate houses and roads 
 Keeping trees and vegetation in the valley to stop soil erosion into the dam lake 
 Preventing noise, dust and pollution during construction 
 Relocating wildlife or special cultural sites in the catchment area 
 Building water ‘ladders’ around the dam wall so fish can swim upstream or downsteam 
 After the dam is built, regularly releasing water to keep the river healthy 


 Types of Dams

Dams can be grouped according to the type of material of which they are constructed as follows; concrete dams are further grouped according to how they achieve their strength and stability.

CONCRETE DAMS
  • Concrete Gravity Dams
  • Concrete Arch Dams
  • Concrete Buttress Dams
FILL (EMBANKMENT) DAMS
  • Earth Dams
  • Earth and Rock Fill Dams
  • Concrete Faced Rock Fill Dams
Concrete Gravity Dams rely on the weight of the concrete of which they are built to resist the forces (gravity, water pressure, earthquake) to which they are subjected. 

Concrete Arch Dams and Buttress Dams can be built using a smaller amount of concrete than that required for a Gravity Dam and, as a result, are cheaper to build. This is possible because Arch and Buttress Dams are designed to transfer some of the loads (forces) on them to the foundation on which they are built ie the strength of the foundation is used to help resist the loads which could not be resisted simply by the weight of the dam wall alone. In all cases the impermeable membrane of concrete dams is the whole dam wall.

Fill or Embankment Dams are grouped according to the material of which they are constructed which, in turn, relates to the type of impermeable membrane used. Earth Dams are built of homogeneous, impermeable earth material so that the impermeable membrane is the whole dam wall.

Earth and Rock Fill Dams have a relatively narrow, impermeable earth or clay core inside the dam but most of the dam is constructed of permeable rock fill which, by itself, would be incapable of retaining water. The impermeable membrane in these dams is the clay core
.
Concrete Faced Rock Fill Dams are constructed of permeable rock fill, the impermeable membrane being a concrete slab constructed on the upstream face of the dam wall. This type of dam has become increasingly popular over the last 25 years or so. A recent example is the proposed 205 m high Bakun Dam in Malaysia, originally put on hold due to the Asian financial crisis. Three Australian concrete faced rock fill dams (CFRD) built in 1970-71 (Pindari, Kangaroo Creek and Cethana) played a significant role in the development of the CFRD type of dam design.

 FIVE BIGGEST DAM IN INDIA

Tehri Dam(uttaranchal)

Tehri Dam located on the Bhagirathi River, Uttaranchal Now become Uttarakhand. Tehri Dam is the highest dam in India,With a height of 261 meters and the eighth tallest dam in the world. The high rock and earth-fill embankment dam first phase was completed in 2006 and other two phases are under construction. The Dam water reservoir use for irrigation, municipal water supply and the generation of 1,000 MW of hydroelectricity.

  • Height: 260 meters
  • Length: 575 meters
  • Type: Earth and rock-fill
  • Reservoir Capacity: 2,100,000 acre·ft
  • River: Bhagirathi River
  • Location: Uttarakhand
  • Installed capacity: 1,000 MW


Bhakra Nangal Dam(himachal pradesh)

 Bhakra Nangal Dam is a gravity dam across the Sutlej river Himachal Pradesh. Bhakra Nangal is the largest dam in India, with a height of 225 meters and second largest Dam in Asia. Its reservoir, known as the “Gobind Sagar Lake” it is the second largest reservoir in India, the first being Indira Sagar dam.


  • Height: 226 meters
  • Length: 520 meters
  • Type: Concrete gravity
  • Reservoir Capacity: 7,501,775 acre·ft
  • River: Sutlej River
  • Location: Punjab and Himachal Pradesh
  • Installed capacity: 1325 MW

Hirakud Dam(Orissa)

TehriDam-Uttaranchal

TehrhhhhiTehrihDahdam built across the Mahanadi River in tribal state Orissa. Hirakud Dam is one of the longest dams in the world about 26 km in length. There are two observation towers on the dam one is “Gandhi Minar” and another one is “Nehru Minar”. The Hirakud Reservoir is 55 km long used as multipurpose scheme intended for flood control, irrigation and power generation. It was one of the major multipurpose river valley project after Independence.

  • Height: 60.96  meters
  • Length: 25.8 km
  • Type: Composite Dam
  • Reservoir Capacity: 4,779,965 acre·ft
  • River: Mahanadi River
  • Location: Orissa
  • Installed capacity: 307.5 MW

Nagarjuna sagar Dam(Andhra Pradesh)

DaNagarjuna Sagar Dam is the world’s largest masonry dam with a height of 124 meters, built across Krishna River in Andhra Pradesh. Nagarjuna Sagar Dam is certainly the pride of India-considered the largest man-made lake in the world. The 1.6 km long with 26 gates dam was symbol of modern India’s architectural and technological triumphs over nature.

  • Height: 124 meters
  • Length:1,450 meters
  • Type: Masonry Dam
  • Reservoir Capacity: 9,371,845 acre·ft
  • River: Krishna River
  • Location: Andhra Pradesh
  • Installed capacity: 816 MW

Sardar Sarovar Dam(Gujrat)

 Sardar Sarovar Dam also known as “Narmada Dam” is the largest dam to be built, with a height of 163 meters, over the Sacred Narmada River in Gujarat. Drought prone areas of Kutch and Saurashtra will get irrigate by this project. The gravity dam is the largest dam of Narmada Valley Project with power facilities up to 200 MW. The dam is meant to benefit the 4 major states of India Gujarat, Madhya Pradesh, Maharashtra and Rajasthan.


  • Height: 163 meters
  • Length:1,210 meters
  • Type: Gravity Dam
  • Reservoir Capacity: 7,701,775 acre·ft
  • River: Narmada River
  • Location: Gujarat
  • Installed capacity: 1,450 MW


Thursday 29 May 2014

How to Start a Construction Company with No Money - Ask Evan

Karcham Wangtoo - A Himalayan Megastructure Nat Geo Documentary

Civil Engineering Estimates

An estimate is a calculation of the quantities of various items of work, and the expenses likely to be incurred there on. The total of these probable expenses to be incurred on the work is known as estimated cost of the work. The estimated cost of a work is a close approximation of its actual cost.
The agreement of the estimated cost with the actual cost will depend on accurate use of estimating methods and correct visualization of the work, as it will be done. Importance of correct estimating is obvious.Under-estimating may result in the client getting an unpleasant shock when tenders are opened and drastically modifying or abandoning the work at that stage. Over-estimating may lose the engineer or estimator his client or his job, or in any case his confidence.
Estimating is the most important of the practical aspects of construction management, and the subject deserves the closest attention of one aspiring to a career in the profession. It is a comparatively simple subject to understand; however, as it brings one up against practical work, methods and procedure, knowledge of it cannot be acquired without close application.
Qualifications of an Estimator
A good estimator should possess the following qualifications:
  • A thorough understanding of architectural drawings.
  • A sound knowledge of building materials, construction methods and customs prevailing in the trade.
  • A fund of information collected or gained through experience in construction work, relating to materials required, hourly output of workers and plant, overhead expenses and costs of all kinds.
  • An understanding of a good method of preparing an estimate.
  • A systematic and orderly mind.
  • Ability to do careful and accurate calculations.
  • Ability to collect, classify and evaluate data that would be useful in estimating.
Good instruction or careful and thorough study of a standard book will help a beginner to become a good estimator. He must, however, try to develop all the above mentioned qualities while obtaining practical experience.

Tuesday 27 May 2014

Purification of water by household items

Method 1: Boiling Water

1.If you are in the wilderness when you need to purify your water, build a fire to boil your pot on. If you do not have pot, you can use any container that is fire-proof.Place the water you wish to purify into a pot. Place the pot on the stove and turn the stove on to high. When water boils, any bacteria that may have been living in it will be killed, thus ensuring that you do not get sick when you drink the water.


2.Watch for rolling bubbles. When bubbles begin to appear, it means that the water is boiling. Let the bubbles continue for a solid five minutes for the heat to have the most effect upon any bacteria that may have been living in the water.
  • Boiling water for 15 to 20 minutes will kill off 99.9% of any organisms living in the water. It also removes most chemicals by vaporizing them. However, be aware that boiling the water will not remove solids, metals, or minerals.
3.Remove the pot from the heat. Use caution when handling the pot and water as they are, as you may have guessed, very hot.

4.Let the water sit and settle. You do not need to do this if you are boiling water that came from a tap and you feel sure that there are no solid items, minerals, or metals in the water. If you let the water settle, any items in the water will sink to the bottom naturally, allowing you to drink the pure water from the top.

Method 2: Using Purification Tablets

1.Use purification tablets or drops. You can purchase these drops or tablets at sporting goods and adventure stores. Keep in mind that this is not the best tasting method, but protection from bacteria is worth a bitter taste in your mouth.
  • Iodine tablets are the most commonly sold purifying tablets, but you can also use chlorine tablets with the same result. These tablets are most effective when the water you are purifying is 68 degrees F (21 degrees C) or higher. These chemical tablets will kill bacteria living in your water. These tablets are most often used by campers in the wilderness.
  • Pregnant women, women over 50, and people with thyroid problems or taking Lithium should consult with a doctor before using iodine tablets.
2.Strain the water if it has large particles floating around in it. You can do this by pouring the water through a cloth and into the bottle or container that you will be purifying your water in. The cloth acts as a strainer that removes the particles floating in the water.

3.Place the tablets in the water. If your tablets or drops came with instructions, follow these now. In general, you will want to use one tablet for each quart or liter of water you wish to purify. Be aware that these tablets generally have an expiration date. If you use them after this date, they are much less likely to be effective. Always check the bottle before using these tablets.

4.Mix the tablets into the water until they dissolve. They must be completely dissolved so that they can mix most effectively with the water you are purifying. Wait 30 minutes before drinking the water, as the tablets need that time to effectively kill any bacteria in the water.[6]
  • You should also be aware that tablets are generally less effective in water that is very cold. If the water is 40 degrees F (4 degrees C), you should wait at least an hour after the tablets have dissolved before drinking the water. You can place the water in the sun to warm it up before using the tablets if you have the time to do so.[7]
  • To lessen the strange taste the tablets give the water, add flavoring to the water (if it is available to you.) Powdered lemonade mixes or a pinch of salt will mask the tablet flavor.
Method 3: Using a Water Purifier

1.Use a pump purifier. You can use these types of purifiers in conjunction with a canteen or water bottle when out in the wilderness. These pumps are generally hand held and made out of a synthetic or ceramic cartridge. Most filters have two separate hoses, one for clean water, the other for dirty water. On the hose that pumps the dirty creek or lake water, you may find a foam flotation device that keeps the hose from sinking to the bottom and sucking up the silty bottom water. The pump will have a plunger or lever that can be pulled and pushed so that water is sucked up, run through a series of filters within the plunge, and then pumped out and into your water bottle.[8]
  • There are also pump purifiers that attach to the sink in your kitchen. These pumps can be bought at any home improvement store and are based on the same concept as the hand pump (though attaching it to your sink saves you the time of actually having to pump the water.)
2.Buy a water bottle with a built in purifier. You can now buy water bottles that have their own filters already built in. These work much like the pumps in that they run the water through a filter before dispensing the water into the bottle.

3.Use an ultraviolet purifier. These purifiers are very easy to use-- you simply stick the pen of the lamp into the water, wait for the light on the side of the pen to turn green, and then stir the pen around in the water until the light turns off. The UV rays kill any bacteria living in the water so that your water becomes safe to drink.[9]
  • Keep in mind that this purifier doesn’t filter out the now deceased bacteria, but despite their continued presence in your water, they are not dangerous anymore.

4.Try out a gravity fed purifier. These are filters like the ones used by Brita and PUR. As the name suggests, these filters use gravity to pull the dirty water through a filter and into the reservoir that contains clean water. To use this purifier, all you have to do is pour unpurified water into the dirty water section, and wait until all of the water has run through the filter. Often, these filters will have two sections--one for dirty water, and the other for clean.[10]
  • These filters are best used at home or at a campsite as they are generally pretty large and would be a pain to tote around in the wilderness.
Method 4: Creating a Purifying System in the Wilderness

1.Form a cone out of a strip of bark. Birch bark, or a bark similar to it, is best for creating this filtering system because it is flexible but will keep its shape. Keep in mind that this method will not fully purify the water, but it will reduce the amount of microbes in the water. This method should only be used in extreme emergencies.
  • If you are having a hard time keeping your bark in the shape of a cone, you could try tying a piece of rope or a durable type of grass around it to keep its shape.
2.Layer the cone. Wildwood Survival suggests layering the cone with sand, charcoal, grass, and gravel (or small rocks.) Charcoal is especially good for removing bacteria. If you had fire, crush up some of the burnt pieces of wood.


3.Pour the water through the cone and into a container. Do this several times to increase the amount of purification that occurs. Again, this method does not guarantee purification, but it will remove a good deal of the contaminants in the water.


Monday 26 May 2014

Slip forming
Continuous slip formed gravity base structure supports under construction in a Norwegian fiord. The visible jib cranes would each be delivering buckets of concrete to the support cylinders during the continuous pour of concrete creating seamless walls.
This article is about pouring concrete in moving forms. See Slipform stonemasonry for another type of slip forming.
Slip forming, continuous poured, continuously formed, or slipform construction is a construction method in which concrete is poured into a continuously moving form. Slip forming is used for tall structures (such as bridges, towers, buildings, and dams), as well as horizontal structures, such as roadways. Slipforming enables continuous, non-interrupted, cast-in-place "flawless" (i.e. no joints) concrete structures which have superior performance characteristics to piecewise construction using discrete form elements. Slip forming relies on the quick-setting properties of concrete, and requires a balance between quick-setting capacity and workability. Concrete needs to be workable enough to be placed into the form and consolidated (via vibration), yet quick-setting enough to emerge from the form with strength. This strength is needed because the freshly set concrete must not only permit the form to "slip" upwards but also support the freshly poured concrete above it.

In vertical slip forming the concrete form may be surrounded by a platform on which workers stand, placing steel reinforcing rods into the concrete and ensuring a smooth pour.[2] Together, the concrete form and working platform are raised by means of hydraulic jacks.[3] Generally, the slipform rises at a rate which permits the concrete to harden by the time it emerges from the bottom of the form.

In horizontal slip forming for pavement and traffic separation walls concrete is laid down, vibrated, worked, and settled in place while the form itself slowly moves ahead. This method was initially devised and utilized in Interstate Highway construction initiated by the Eisenhower administration during the 1950s.

History
The slip forming technique was in use by the early 20th century for building silos and grain elevators. James MacDonald, of MacDonald Engineering of Chicago was the pioneer in utilizing slip form concrete for construction. His concept of placing circular bins in clusters was patented, with photographs and illustrations, contained in a 1907 book, “The Design Of Walls, Bins, And Grain Elevators”.

In 1910, MacDonald published a paper “Moving Forms for Reinforced Concrete Storage Bins,” describing the use of molds for moving forms, using jacks and concrete to form a continuous structure without joints or seams. This paper details the concept and procedure for creating slip form concrete structures. On May 24, 1917, a patent was issued to James MacDonald of Chicago, "for a device to move and elevate a concrete form in a vertical plane". [6]

James MacDonald’s bin and silo design was utilized around the world into the late 1970s by MacDonald Engineering. In the 1947-1950 period, MacDonald Engineering constructed over 40 concrete towers using the slip-form method for AT&T Long Lines[7] up to 191 ft tall for microwave relay stations across the United States.

AT&T Long Lines relay tower in Indiana constructed with the slip-form method.
The former LandMark Hotel/Casino in Las Vegas was constructed in 1961 by MacDonald Engineering as a subcontractor, utilizing MacDonald’s concept of slip form concrete construction to build the 31 story reinforced steel tower.[8]

The technique was introduced to residential and commercial buildings in the late 1960s.[2] One of Its first uses in high-rise buildings the United States was on the shear wall supported apartment building at Turk & Eddy Streets in San Francisco, CA, in 1962, built by the San Francisco office of MacDonald Engineering. The first notable use of the method in a residential/retail business was the Skylon Tower in Niagara Falls, Ontario, which was completed in 1965. Another unusual structure was the tapered buttress structures for the Sheraton Waikiki Hotel in Honolulu, Hawaii, in 1969. Another shear wall supported structure was the Casa Del Mar Condominium on Key Biscayne, Miami, FL in 1970.

From the 1960s, the vertical technique was adapted to mining head frames, ventilation structures, below grade shaft lining, and coal train loading silos; theme and communication tower construction; high rise office building cores; shear wall supported apartment buildings; tapered stacks and hydro intake structures, etc. It is used for structures which would otherwise not be possible, such as the separate legs of the Troll A deep sea oil drilling platform which stands on the sea floor in water about 1000 feet (300 m) deep, has an overall height of 472 meters (1,549 ft), weighs 656,000 tons, and has the distinction of being the tallest structure ever moved (towed) by mankind.

In addition to the typical silos and shear walls and cores in buildings, the system is used for lining underground shafts and surge tanks in hydroelectric generating facilities. The technique was utilized to build the Inco Superstack in Sudbury, Ontario, and the CN Tower in Toronto. In 2010, the technique was used to build the core of the supertall Shard London Bridge tower in London, England.
 (4 photos)

TIGER STONE MACHINE

The Tiger-Stone!

The Tiger-Stone is a six-meter wide machine that you at once, the whole street is perfect (re) paving, including edging. The device is amazingly simple to operate, any person can work with it in five minutes. The Tiger-Stone utilizes the force of gravity, in order to get the stones in the path are required. No moving parts Naturally lower the stones down and go directly into the correct pattern onto the road. Also, with the aid of the Tiger-Stone applied directly to the edge finish. The end result is that the stones are locked in the correct manner lie between the curbs. The road is finished immediately.

Stunningly complete
The solid construction is the Tiger-Stone is not high maintenance. For processing, there are virtually no mechanical parts required. This means that the machine is very safe for the user and the environment. The Tiger Stone moves electrically upon caterpillars, this drive is very quiet. In addition, the tracks provide good weight distribution of about 2.5 ton machine. Following the route to be done with a sensor which follows the curbs. The processing of various widths is possible. The Tiger-Stone a canopy can be positioned so that it can be worked in any weather.

The future

The expectations for the Tiger-Stone are high. The market is the need to machine (re) paving large because the physical strain on the paver as possible should be avoided and limited. Various national industry-specific organizations and the government has been looking for a solution to achieve this. In August 2008, the Working 1500m ² rule for new paving released, now they argue, "all the outreach work that can be machined must be done that way."

Different elements and various dressings

The objective of the Tiger-Stone is to provide a more versatile (re) paving machine, which is the hole in the paving machine fills the market. The Tiger-Stone is Specially developed for the laying of the elements, the stroking, to perform. The Tiger-Stone is a very wide range of processing elements, and it also captured in various contexts.

Six feet at once close!

The Tiger-Stone can be a maximum width of six feet down at once. Also, it is possible to join to explain, "bicycle lanes' directly, if desired, in a different color, and co


nnection. One condition is that the total working range is not more than 6 meters. The sizing is moreover adjustable, so that even narrower roads can be formed. The actual laying of stones in the machine is done manually. The founder is ergonomically behind stone bunker, where the stones were laid by a mini loader in.

The stones are then placed along the top hand on the afschuifbord. After all, the first meter is placed manually in the proper relationship at the bottom of the afschuifbord. Then just have the stones with the right side up to slide off. The founder The stone will automatically connect to the previously established connection.  

At the time when it is laid fully afschuifbord with the stone layer, the Tiger-Stone operates by means of a push button. The Tiger-Stone is moved backwards, so that the stones on the sand bed afschuifbord bags. The route of the Tiger-Stone is determined using a sensor that follows the retaining straps. The result is a direct enclosed path, which does not need further edge finish.

The position of the layer is constructed so that one can work. At the same time with one to three man The number of persons on the machine to determine at its discretion. Consequently, the output of the machine is determined. The drive is electric and therefore very quiet and promoting corporate social responsibility. With two people, the Tiger-Stone can lay at least 300m2 per day. A conventional paver lays 75 to 100 m2 per day (upper + paver).